Showing posts with label healthy eating. Show all posts

Saturday, March 29, 2014

Meal Planning - 6 weeks at a time!

6 Week Meal Planner

My wife, Danielle, has recently created a 6 week meal planner, along with recipes, shopping lists and templates.  This is available as a PDF download that you can print off, and a printed version in a ring binder that you can add to with your own recipes. Order here: http://modernpioneer.highwire.com/product/6-week-meal-planner

This 6 week meal planner comes as 2 options:
  1. downloadable PDF for you to print at home, or
  2. a paper version that we can mail to you. The paper version comes in a ring binder.
This meal planner includes:
  1. More than 30 recipes, organized by cooking time
  2. 6 weeks of planned meals
  3. shopping lists
    • shopping lists are coded so you can easily edit for recipe changes or changes in schedule
    • includes pantry list for your staple food and non-food items.
  4. Extra templates to add your own weeks of plans
  5. Suggestions (but not recipes) for side dishes and breakfasts,.
The meals use a variety of cooking methods and times. They are adaptable and include freezer recipes for future prepping. Most are from-scratch recipes, but allows for you to substitute in your own recipes or pre-prepared versions.

 Order here: http://modernpioneer.highwire.com/product/6-week-meal-planner

Wednesday, August 14, 2013

The False Idea on Freezer Food, The Food Storage Basic's Part 1

People love to get great deals on food that comes on sale, fruits, vegetables and meat alike. It is almost a no brainer when it comes to food cost and sales.

Long ago the process to keep food was less healthy and affordable than today. From Vinegar, Oils, Dehydrating, Smoking and Salt Curing, these methods were used and passed down for hundreds of years. Today, in places you might visit, cured meats and sausage hang. When you walk into these places two things happen, your repelled or your mouth begins to water.

While in Italy, I walked into a meat store while passing through a small town. Off the beaten path, I knew I was in a place that not very many visitors came by and it was a place of locals only. The pungent smells hit me first, it was kinda different, then I started to smell the layers of different smoked and cured meats.

Dust laid on some of the meats as if they were just left there, unsellable for what ever reason. My education told me they were longer term curing meats and might be ready now for the harvest. The woman, having a brown stained dress on, a thick cotton, came up and started to greet me. I said hello and passed by her to look and ask her about some Pepperoni I spotted.

She made her way back to the counter where a drawer was, she pushed it in and walked to a cabinet and opened it to reveal walls of hanging cured meats. Some had been sliced on a few times, some new, some whole. I even spotted some cheese and fish.

The reason I tell you this story is so that you understand that meats can be stored and cured, even today it is still used. However, it has to be done right.

For now I want to cover a few basic things, long term and short term food storage for the average person or some one who is just starting out at food storage. The one book I found useful in understanding long term or alternative preserving is this book.


Preserving Food without Freezing or Canning: Traditional Techniques Using Salt, Oil, Sugar, Alcohol, Vinegar, Drying, Cold Storage, and Lactic Fermentation


Second, I want to get your ear on something that is misleading and although generally not a common case, but is for preppers, homesteaders, gardeners and folks who just want to plan cheaper meals it is a great concern. Salt cured meat and freezing.

After reading a article in Meats published by Hobby, it was brought out that meats like sausage, bacon and other salted meats will go rancid and decay after awhile. Before this article, it never occurred to me that  meat would go bad, even if vac packed and handled properly. The Author of the article went on to explain, and then all sorts of light bulbs started going off.... 

As I read, it dawned on me, about the funny taste my own sausage had after 7 months in the freezer. I had not eaten much of it, the tainted meat, but enough to know it wasn't right so I stopped eating it. Then I started to ponder the salt content and how that would stop the meat from freezing solid, like a rock or really hard. I went down and grabbed a slab of my own bacon from the freezer, not that bacon sits very long around here. But I did a flex test on a package. I had preserved it correctly, I was confident in my workmanship and knowledge of processing the bacon. 

So I let a few packages of that old sausage in the freezer and tested it several ways including cooking it and smelling it against the same recipe but fresher, 3 months fresher. I also did a package push test on the meat, while still vac packed. I found that the sausage that was older, the outside of the meat, although just a thin layer, pushed around easier than the fresh sausage which didn't have a layer to push around. 

I cover this issue more in depth in one of my Food Storage Workshops on-line. I mention this today because so many people are starting to buy bulk and perhaps not think of this or not rotating their freezer stock often enough. 

Be sure to check out Part 2 in this mini series, The Food Storage Basic's. I will be covering Dehydrating methods, processes and debunking some of those myths and wives tales. You will learn long term and short term approaches. I will toss in a few good long term recipes to boot...
 

Saturday, October 20, 2012

Raw Milk Turns Into Many Homestead Products

As I sit here this evening, while the cool fall air swirls around the trees to pull off the dead leaves and floats them to the ground, today was a good productive day.

You might remember the other night I went to a secret location and got some raw, right from the cow, milk. Now before you start posting your thoughts of how bad raw milk is for you, I will not listen to your nonsense. Your wasting your time preaching to me about all the things bad with raw milk, and if I wanted to waste my time I would combat and debate the issue with you. But I am not going to do that.


As I used a method taught to me by my Mom, I had confirmed the technique of separating the cream from the top of the milk. So out of the milk I got I ended up with enough cream to make nearly three pounds of butter. You see I dodged that "how much cream did you get" bullet? I didn't measure my cream as I should have because I forgot to and just moved into butter production first thing this morning.

So, I know your ready to get into the whole butter production, but I wanted to let you know in my useful gadgets I have a Mixer Stand like the one I used to make my own butter. One of these days I am going to blog a list of stuff I make with my Kitchen Aid stand mixer.

So I started out by allowing my cream sit overnight and then just chilled it a couple hours. I added some into the stand mixing bowl, and kept adding until the mixer was going on high and I always make a foil bonnet around it to keep it full.


 So as it starts to churn, it will thicken up and the milk and as you can see in the photo below, the level of milk has dropped compared to the one above. Generally I just keep adding cream until I get enough where I know my machine can handle the butter.


So by adding foil around the edge, tucking it in, I can fill my mixer up pretty full without spreading milk all over the kitchen.


Taking a peek in, can you see the noticeable change it texture and color?


Well it won't be long until my butter starts to clump and balls together. When it is at this point it is time to take it out and strain it.


Now it is time to start cutting the butter, if you don't cut it, it will become rancid very soon and you have wasted all your cream, time and effort. Cutting the butter with a pastry cutter and cold water will clean out all the residue milk that has been collected during butter making process. Ice cold water added, than cut it for a couple minutes, strain add new cold water, and repeat until your butter cuts clean in water. I use 1/2 cup cold water during my first cut and mix that with my buttermilk. The remainder several batches after the first one I toss out.


This is my last cut, clearly from the first photo you can see the water color get much clearer.


Now I will strain the butter one last time and begin to press it into containers for long term storage. Notice the water coming out?


Don't be afraid to poke your fingers down into the butter to remove the air pockets and the water will also continue to come out. Now it is time to smooth it out for long term storage...


Some advice, never share your source for raw milk by bragging about it, share with people you know if the farmer allows it. Make sure to visit your farmer and make sure they are a clean milker. If your lucky as I am, mine doesn't use hormones and mine grazers and produce organic milk for the market.

So tomorrow for breakfast I will have homemade buttermilk (made from my by product from butter production) pancakes with my homemade butter covered in my homemade maple syrup.... I feel pretty proud to say all those homemade words in one sentence....


Friday, September 14, 2012

The Birth Of The Smoothie

There are a few dishes that sit on my table today as did when I was a child. It is sometimes wonderful how we relate food today and the memories from our childhood, sometimes it isn't.

Traci, my sister can correct me on this one, however I am sure it was in October of 1978. We lived in a shanty in a small town in Clarksburg Pa. It was once a sturdy home, left to time and rented without up keep. The coal door still opened as we would feed the coal furnace from the basement and the coal truck put coal through that door. I doubt that at any time in life of that house was it ever warm during the winter.

I had returned from shoveling coal into the furnace as I was told to do, steam in the air, windows covered in condensation, the old brown TV with a fuzzy picture of the evening news was on. Traci and I often peeled potatoes as well as help Mom prep dinner as she had a full time job.

Dinner time in our house was that, all the family come together, sit, ask for people to pass around stuff. It was a Friday evening and Bobby's two children spent that weekend with us. So with 4 children, when Mom shouted dinner, the whole house seemed to rumble and shake as we made our way to our seats at the table. But this night it was a quiet "drag" to the table.

It isn't my fault if your having your own flashbacks by this time, perhaps, but let me tell you more.

Bobby and Mom thought a good meal was a meal where you would have to eat stuff that children think is gross. It doesn't matter how it was cooked, it was just nasty. Bobby's pick that Friday's meal, saute' liver and onions... with mashed taters...

I tried for an hour to climb my way through this meal, it was nothing smaller than Mt Everest, and almost no place to drive my fork in. It was cold and harsh, but Mom just kept pushing forward... Your not leaving that table till your plate is clean.. I remember listening to the clock tick as if minutes were hours...

As  time past, I was alone in the kitchen while every one else fought for a spot to watch TV. Mom went in and put her night gown on... I knew better to waste the food, that is the real reason I didn't try to out smart my way through it. I wasn't a very clever child either and knew I faced a spanking or worse if I did get caught. Then, with a sad face as I looked at her, she said right....

Mom was a War baby and was raised by her Mom and a nanny as the story was told to me. So she had some of that hard liner and dry humor about her that had been caste into her as a young child by a Brit Nanny.

The blender was pulled out, she grabbed my plate, scrapped it into the blender, she came back and grabbed my golden Tupperware plastic glass which was filled with whole milk. In it went like she was a master chef creating a master piece... The blender bogged a few times at the start... than it ran...

She filled that same glass up, placed it before me and ordered me to drink it. I did so in total fear that she was about to become a monster.. Than she filled it up again until the blender was empty, again she ordered me to drink it, but this time my gag reflexes were about to explode. I lifted it up slowly, and couldn't get that liver infused milk drink taste out of my mind. I was crying and begging my way out of it, but I was stuck...

So the birth of liver and onions smoothie was born... The taste test didn't do so well, so it never became a popular fade diet or smoothie...

PS Please look at the labels I have attached to this post....


Friday, September 7, 2012

How To Make Your Own Breakfast Sausage W/ Recipe

Memories of smelling bacon from downstairs always woke me up and made my tummy growl. At home on the farm, it was a frosting designed window as I looked out the window at the sun rising. At Grandpa's it was a cool morning in Hornsby Hollow, and the sun was up and the chickens were calling out to be let out. Isn't it funny how we can recall memories from smells?

Well, I am creating new smells for my children, and from my own recipes, local meat, and organic seasonings, so which I will add were grown right here on my homestead. Seasonings are troublesome for me as I can grow a lot, but some I can not and I rely on other suppliers, so I do the best I can to research my sources.

So lets talk about breakfast Sausage, why? Because I want to do something different and there is a very limited selection out there, and the ones that are out there that are links, some of them are so processed they aren't even sausages....

Ѽ  How about a couple things found right on the Homestead? How about some Maple and Apple Breakfast Sausage links?

4 lbs of lean pork
1 1/4 pork fat
6 tsp. garlic powder
2 cloves fresh garlic
3 tsp. crushed Sage
3tsp black pepper
1 tsp of celery seed
2 tsp of smoked paprika
1 tsp marjoram
2 tbsp of dried parsley
1/2 apple sauce
1/3 cup apple juice
1/4 cup maple syrup
3 tbsp of lemon juice
 34-36 mm casings  ( I like New Zealand Lamb casings)

Cut and grind meat and pork fat to a fine texture together..

In another bowl, blend spices add apple sauce/juice and lemon, mix well. Add bowl ingredients and meat and mix at room temperature until well mixed. Put it in the fridge and let it set 12 hours.

Soak your casings and rinse them several times...

Stuff the meat into casings to 5 or 6 inch long links, or make into patties.... Freeze or use within a couple days.


Tuesday, August 14, 2012

Ѽ Modern Pioneer's Original Apple Chip Recipe Ѽ

 With all the recent request for my Wonderful recipe, I decided to blog it..

Modern Pioneers   Ѽ Ѽ Apple Chips Ѽ Ѽ
1/3 cup Cinnamon
1 cup cane sugar
nice pinch of Allspice (heavier pinch if you want the taste to lean towards Apple Pie)
Pineapple juice
7 pounds of choice apples (use sour apples for sweet/s
our chips)

I use two thicknesses, just over 1/8 for crunching chips, 3/16 for less crunchy. Cut Apples into desired width, placing the fresh slices into the pineapple juice until you fill the bowl. No need to soak them as they just need to be coated with the juice. the juice has vitamin C which will protect the color.

Mix the Cinnamon, sugar and allspice together blend well. Sprinkle over apple chips already placed on trays. Then dehydrate until crispy ( ⌚ 8-14 hours)

If you want to omit the sugar altogether you can do that but the flavor will be much stronger, and I agree healthier as well. You can do this in a oven, but I am not sure how that would work.


If you want to make some really different fun chips, consider getting a spiral slicer like this one. Great for other dishes as well.

Wednesday, August 8, 2012

Canning Those Tomatoes/Sauces and Better Sauce Ideas

While waiting for the bumper crops to start, those tomatoes start to come in. I love to eat the wonderful fruits as they come in the house, having that kind of reward is so wonderful. I have, through the years come up with many uses as has Danielle. Coming from England she brings with her a different pallet as well as fresh eating ideas.

Along with those big round bundle of joys comes the start of the Paste Tomato harvest, Roma's. I plant Heirloom Roma's which don't grow as big as the ones at the store, but are packed with 2x more flavor and meaty goodness. As the war against GMO's continues, I couldn't tell you the differences of nutritional values between the two because I plant Heirloom seeds.

A few years ago I bought a few Roma's at my local GMO peddler store. I cut mine open and compared them side by side. Mine didn't have such an even color, nor was its shape perfect. Mine was smaller and didn't weigh as much and wasn't as plump. When I cut them open I could see right away mine was more compacted and wasn't as juicy. But the color inside was as rich as the outside color, the GMO fruit was whiter and had more runny juice inside. It had a much better shape and even blotted color.

When thinking about a sauce tomato, consider water content and pulp content as these are important qualities when making good sauces. Starting out with a good quality Heirloom Roma is the first step in making a good sauce.

Once the Roma's start to come in, just before the bumper crop, for a few weeks you will start to harvest a few pounds a week. The rate at which they start to come in increases every couple of days. This period last a couple weeks in my zone, and so I have to prepare and process those early Roma's.

Often I will process the first ten/fifteen pounds and freeze the pulpy juice and when the bumper crops hit, and I am in full processing swing, I will thaw that stuff out and mix it with my fresh tomato sauce. However, in both cases I allow my homemade puree to sit in a stainless steel bowl, covered in the fridge, overnight.

If your making your own stuff, homesteading or just being frugal, time and money is the two things we want to reduce. This can also help make us a better product. By letting the homemade puree sit overnight, the water content of the juice rises to the top, allowing us to skim it off so that it isn't stirred back into our sauce, reducing energy and cooking time to make a quality, thick sauce.

Even after canning, compare my approach to your traditional sauce by setting the two jars side by side on a shelf for a few days. You will see how much less water content my method has. Also your sauce will be thicker, richer and you will use 30% less energy making the same amount of product.

Although I adjust the Spaghetti recipe a little, I use the one found in Ball's Blue Book.


Sunday, August 5, 2012

POOW__TAT__TOE Dehydrating


This food has long been the staple in many parts of world, and I believe has saved lives as much as ended lives. Stupid people are still building and shooting each other with potato guns. Then there was Black 47 in Ireland, again the source of people dieing and starving because crops were wiped out.

One of those frequent questions I am asked about is how to do potato in a dehydrator?

Lets talk about uses, and the first would be to make your own Scalloped Potato oven dish... Then there are skillet potato's, trail potato dishes, and they are light and store really well. They are really affordable and come in big ole bags that you can just dehydrate for a week and turn a 100 pound bag into 25 pounds of goodness.

The process is simple to address, but I suggest having a food slicer as you will be able to get lots done in a short amount of time. If all you have is a mandolin slicer, use it.... I clean them well and leave the skins on for nutritional reasons.

Get a bowl of salted water beside your work station, fill a vessel or sink with cold water add ice, put a pot large enough to dump your potatoes in on the stove on high, salt it as well.

Slice your potatoes just about 3/16 of an inch thick and place them in the salted water at your work station. As you slice the potatoes, place them into that bowl making sure enough water to cover them. Once you have finished them take them to the stove and put into your boiling water. Watch the water as it heats back up. Once it returns to a small boil, boil for 6 minutes, stirring gently and often to separate the pieces, drain and place into cold water right away. Rinse then one last time and rack them into your dehydrator and dry them until hard.....

Pictured here on the right as they are temporary place in a zip storage bag next to a box bought big manufacturers product, which looks starch white and unnatural to me. A few years ago I bought a box sample from Harmony House Foods, which is one of the largest dehydrating companies in the world, and mine looked just as theirs did. So don't get all worked up over the less white look of your potatoes, unless they look nothing like mine.   
Barry Farm does sell a dehydrated cheese that you can buy pretty cheap and make up your own recipe or use mine. Either way, this will be a rewarding dehydrating project/food store.


Wednesday, August 1, 2012

Report: Mushroom Log Project

With the drought in full swing, I have had other worries on my mind other than my mushroom log tower. In the spring as it came in, if that's what you want to call it, I checked my logs after every rain. Time and time again I left thinking maybe soon.

As it sat on my mind from time to time, I became discouraged. I spent about $32 dollars and made a lot of effort to complete this project. I don't like wasting time or energy let alone money out of my self sufficient fund. Mark, would remind me to check my logs after he found some on his... It was a constant reminder that I had failed that project. My research, when I did the project had slipped my mind this past spring or the negative just masked it.

So I went to the farmers market and a man was there with a table full of Shiitake mushrooms, we began to talk and we covered the same conversation Mark and I had the day before. Then I decided to take what I had learned, what Mark and I talked about as well as the man at the Farmers Market and put it into action.

So Saturday, Joshua and I took the logs to the pond, lashed them together, and plunged them into the pond. Sunday, after church, we took them back out after a 24 hour soak. At first they just seemed water logged, so we continued to stack them up and I would return Monday to check them out.

Monday came and I forgot to check on them, so yesterday I went up and checked on them again. Oh, I had hoped that they would show signs of mushrooms growing, but I didn't want to lift my spirits to high so when I was disappointed I wouldn't have far to fall back. Life does that to us from time to time doesn't it?

So as approached the pile I saw something, a small round light brown looking thing... I had a closer look... Well, what do you know it WAS a mushroom. I quickly looked all the logs over... and they were EVERYWHERE!! I was so excited, I started to count them, then I saw two growing from one hole, I thought " hmmm reminds me of a double yolk egg... cool ". A brief few photo's, and off  I went to the house to make an announcement. I did and everyone was like "good for you", Jessica said "gross, I hate mushrooms", Josh walked out to have a look!!!

So here it is Wednesday, and here is a few photo's of my rewards.... But first, I gotta say this.... YES another self sufficient skill done!!! Off the SS BUCKET LIST!!


Thursday, April 21, 2011

Planting Some Good Eats On Your Property, Make A Statement.

Let say first, that I am not a total Non-GMO organic farmer. When it comes to some items, like blackberries, I find the GMO types to be just fine. They taste fine, and serve the needs that I use them for. Now I won't change my veggie seeds that are heirloom and non-gmo seeds that I have bought, traded or gathered. I don't remove folks post on my blog, because you have your opinion and I respect that, so be sure to honor me with the same respect.

Darker the berry, the sweeter the juice..... So I am going to start out by telling you about my personal A+ choice for a neat property line, or hedge row of your own. The most, best producing blackberries I have ever grown have been the Darrow Blackberries. yes they do cost a little more, but trust me when I say that the rewards are plenty and you will enjoy picking berries without the thorns. I like my Chicksaw blackberries as well, and they have some mean thorns....

The blossoms are nice to see, and the fruits are HUGE and living in zone 5 the Darrow proves to be a steady prducer of high quality fruit.

I also suggest this berry for my city dwellers and senior folks who just don't went to give blood every time the go berry picking. Even if you plant these in different areas of your property, 5 plants will produce enough berries for a family of four.

I like to saute them in a little stevia  and pour them over my buckwheat pan cakes, I will also add a little butter as well. I like maple syrup, but I also like fruit.

Wednesday, March 30, 2011

Kindle Readers, A New Gardening Book By Jason Akers

The self sufficient gardener, Jason Akers has completed his ebook, The Process Oriented Gardener.

Product Description

The Process Oriented Gardener is all about gardening the efficient, responsible and sustainable way-by looking at gardening as a process. A process is full of inputs and by reducing these inputs and providing them for ourselves we can reduce the cost and the "toll" of gardening. A process includes steps that allow us to do better work faster. By following the steps I lay out you will do things the ways that are easiest and best. And a process concludes with outputs. In the garden this is the harvest. Learn how to best utilize your harvest.

Check it out, it could help you grow more food efficiently, with less effort, and cheaper. We all love that, cheap and better!!

Tuesday, March 29, 2011

The Anti Bird/Blueberry Project, Save The Cherries... Re-Purpose Bench Photo

I also am working on a anti frost/bird project in the Blueberry patch. The idea is to be able to gather ripe fruit, protect the flowers and fruit from frost and the birds. If I can get this right, I will also build the same hootch to protect the cherries too... A simple recipe from my moms kitchen was to use an Angel Cake, Blueberry yogurt, and fresh blueberries cooked in sugar just till they popped, cooled, and both poured over the cake. Simple, easy and yummy.....


This will be used to cover the bushes with a net, as well as plastic to protect them from frost. This year they are finally large enough to spend the $23.00 it cost me for this build. I have on hand a bunch of old post as well as welded wire I got at a auction for 30 buckets last fall.

I am going to take a few moments and talk about my cherry bushes. From what I understand the root stock of a cherry tree was grafted to a bush stock, many times over till it became a cherry bush. Last year I got just a few cherries after the frost, I was out of town and didn't check the weather before I left. Don't you just wanna punch yourself for not doing what can put food on the table? I was so mad I looked at myself in a mirror and said, stupid....

So are they sweet or tart cherries? That's a good question, the ad that sold them stated you could pick them from the bush, and eat them. So that makes me think they will be sweet ones, we'll see this year. I want to share a 3 year photo of them with you. These were just wee little twigs when they arrived home, and now are 1 1/2 at the base, and ready to start producing this year. I so look forward to having my very own cherries... I love these little bunches of flavor!!!


Do you stop by road side trash piles? Me too.... Me too.... (assuming you do) and I find useful stuff to fix or re-purpose. But I am strict on myself these days what I bring back home. In the beginning I would take stuff and said, yes I will find a purpose for that. The fact of the matter is that I ended up making a run to the dump and paid to put that stuff in the land fill.

Two years ago I saw this bench and thought how nice it would look near the pond.... There it sets, covered in dead plant stems. But that is going to be a new project this summer, honestly, I double dog promise I will get it done... Can you imagine this bench in your garden? I know, right.. LOL

Thursday, March 24, 2011

Run In With The State Boys, It Gets Dangerous, Pics Posted.... Law Men...


Today I had a run in with the state boys, nobody likes the local or federal government getting in the middle of anything so close to home, let alone our food supply.

Dad worked 32 years as a law man, and in my mid teens, I was a latch key kid who did laundry so dad had clean uniforms to work his 15-18 hour days. Far from the farm and country living at its finest, helping us, helped me in my culture shock of city living. Dads life was cut short, but it was at a rare  lunch meeting that he told me about how he felt people saw him and why he did his job. There was no reason or emotional issue I am aware of that caused him to make this statement to me, he just did.

Dad seemed to be some what out of the norm this day, he had called me for a last minute lunch date. Dad said to me.. " You know son, it is funny that people hate me so much until they need help, and when they need help they are quick to cling and hang onto me " I would learn later on that he had secured a awful crime scene.


I have nor will ever look at Law men as a threat or out to get me, they have a job to do and most do it and some take advantage of it. Some law men, like my friend that works for the State Game Commission, have a job to do to protect us as well as animals.


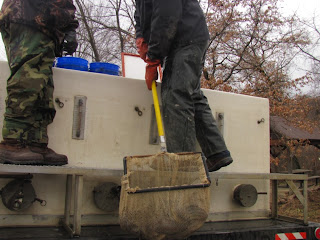
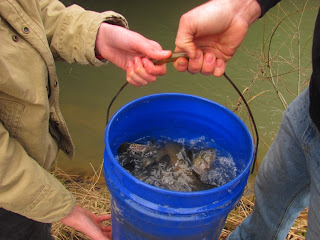
And they do mean business..... He wanted them put in the water as soon as possible, without recall of size or weight or even type. He allowed me to join in with a certain group of folks, and I was given a 5 second rule in one stop to hard film as well as video events going on.

The location of the pics/video is secret and the people agreed to be filmed, but no names were taken. Trophy fish were raised and released as part of a state run program, released 3 weeks prior to opening day to give the trout a real fighting chance. I agreed to hard film/video and say nothing about the hard photos, so I will post them now and mention the video will be out soon.

They block off the area and keep people/cars away while they operate in a kind of strike force blitzkrieg style to release the fish in secret. Often people follow them to try to get close and see the fish being released. One note was made to me about a arrest two years ago, when a citizen pushed his way in breaking the area of security. He was warned several times, and then placed under arrest for tampering with law enforcement efforts. I asked the out come of that case, but he declined to offer me an answer.

He noted that people, if given a chance, will do what they have to do to catch a trophy size fish. " Like a soccer Mom that gets to emotional, fishermen also can get over whelmed with feelings and do stupid stuff. " I asked him if that arrest was the most serous? " No, not at all..... Eight years ago I was called to a farm where some one reported 8 grown deer had been shot, out of season. Later I found thirteen deer that had been slaughtered three big bucks, and the rest were does. The bucks had heads missing as well as their hind quarters and loins. The does had only their loins and rear quarters removed, the rest of the meat went to waste. I arrested the men, who admitted guilt, and they paid $350.00 per deer plus court cost, revocation of their hunting licenses for five years. My job has a very serous/dangerous/grim side that people don't see. I like people and animals, we have laws to protect the animals, and tht is my job, to protect the animals "