Showing posts with label great ideas. Show all posts

Thursday, October 17, 2013

Beam Making, The Bridge Project

When I started to plan the second bridge project, I took everything I learned from the first build, and applied it to this project planning. The first bridge, still standing and handling people and equipment traffic, had its flaws and bad approaches.

Nothing in Homesteading is perfect and learning as you go is a tough way to get things done. However, it sure makes for a learning curve that is not soon forgotten. Building my first bridge, I used lumber that was left here from the old home built saw mill that once occupied a space above the pond. When I dug the holes to put in the main supports, I used a string to aline the post and holes. Over a 20 foot span, I missed my mark by 3 inches, so cutting the lumber to fit properly took twice as long as it should have and the boards had to be custom cut and fit in.

Have the out building that I use to dry some of my food such as beans, onions and garlic has its advantages. Split in half inside, one side has woodstove and the other has a force fan which pushes heat to that side and has a electric 220 volt heater as well. The woodstove side also has a evaporation hood to vent out the moisture when cooking down sap during sugar season. As a manufacturer of copper range hoods, that skill has helped me along with the vent hood.

Sixteen months ago I fell a couple of Red Oak Tree's on my property. I set them on top of some other logs to season. Partially seasoned now, I have started to cut them and will allow them to un-stress and normalize as the seasoning process continues inside the out building.

Once inside, after I finish cutting the beams to 10 x 10 x 12, I plan to control the moisture level and hang the beams 7 feet off the ground to the ceiling to take advantage of the heat. I fire up the woodstove a few times a week keeping it going during the weekend, I maintain a temp of 65 degrees. The idea is to control the moisture and allow the beams to twist, crack and do what they will do before the final cuts and building with them.

The final cuts will be made using a tried tested method, using an Adze. So lets take a look at the preliminary cutting of the beams. You can see the quality of the wood now that I have cut into it. Although these are not yet seasoned all the way, I am using a approach that I have in the past that I know will work and produce a high quality beams that will be the running beams for the new bridge.


Although this project will be done in stages, I plan to blog and share lots of photo's in the future so that you can better understand what I am doing and my approach.

Wednesday, August 14, 2013

The False Idea on Freezer Food, The Food Storage Basic's Part 1

People love to get great deals on food that comes on sale, fruits, vegetables and meat alike. It is almost a no brainer when it comes to food cost and sales.

Long ago the process to keep food was less healthy and affordable than today. From Vinegar, Oils, Dehydrating, Smoking and Salt Curing, these methods were used and passed down for hundreds of years. Today, in places you might visit, cured meats and sausage hang. When you walk into these places two things happen, your repelled or your mouth begins to water.

While in Italy, I walked into a meat store while passing through a small town. Off the beaten path, I knew I was in a place that not very many visitors came by and it was a place of locals only. The pungent smells hit me first, it was kinda different, then I started to smell the layers of different smoked and cured meats.

Dust laid on some of the meats as if they were just left there, unsellable for what ever reason. My education told me they were longer term curing meats and might be ready now for the harvest. The woman, having a brown stained dress on, a thick cotton, came up and started to greet me. I said hello and passed by her to look and ask her about some Pepperoni I spotted.

She made her way back to the counter where a drawer was, she pushed it in and walked to a cabinet and opened it to reveal walls of hanging cured meats. Some had been sliced on a few times, some new, some whole. I even spotted some cheese and fish.

The reason I tell you this story is so that you understand that meats can be stored and cured, even today it is still used. However, it has to be done right.

For now I want to cover a few basic things, long term and short term food storage for the average person or some one who is just starting out at food storage. The one book I found useful in understanding long term or alternative preserving is this book.


Preserving Food without Freezing or Canning: Traditional Techniques Using Salt, Oil, Sugar, Alcohol, Vinegar, Drying, Cold Storage, and Lactic Fermentation


Second, I want to get your ear on something that is misleading and although generally not a common case, but is for preppers, homesteaders, gardeners and folks who just want to plan cheaper meals it is a great concern. Salt cured meat and freezing.

After reading a article in Meats published by Hobby, it was brought out that meats like sausage, bacon and other salted meats will go rancid and decay after awhile. Before this article, it never occurred to me that  meat would go bad, even if vac packed and handled properly. The Author of the article went on to explain, and then all sorts of light bulbs started going off.... 

As I read, it dawned on me, about the funny taste my own sausage had after 7 months in the freezer. I had not eaten much of it, the tainted meat, but enough to know it wasn't right so I stopped eating it. Then I started to ponder the salt content and how that would stop the meat from freezing solid, like a rock or really hard. I went down and grabbed a slab of my own bacon from the freezer, not that bacon sits very long around here. But I did a flex test on a package. I had preserved it correctly, I was confident in my workmanship and knowledge of processing the bacon. 

So I let a few packages of that old sausage in the freezer and tested it several ways including cooking it and smelling it against the same recipe but fresher, 3 months fresher. I also did a package push test on the meat, while still vac packed. I found that the sausage that was older, the outside of the meat, although just a thin layer, pushed around easier than the fresh sausage which didn't have a layer to push around. 

I cover this issue more in depth in one of my Food Storage Workshops on-line. I mention this today because so many people are starting to buy bulk and perhaps not think of this or not rotating their freezer stock often enough. 

Be sure to check out Part 2 in this mini series, The Food Storage Basic's. I will be covering Dehydrating methods, processes and debunking some of those myths and wives tales. You will learn long term and short term approaches. I will toss in a few good long term recipes to boot...
 

Wednesday, October 3, 2012

Winter Grains For Green Cropping in The Spring

As the weather gets cooler, the leaves start to die, the trees begin to fall asleep for the coming winter months. Daytime temps are a hit and miss as the weatherman tries to get us ready for the day ahead. The morning sun beams through the early morning fog as the dew drops from the blades of grass collect and drip.

The garden has given up the last of her bounty, and it is time to take down all that garden art that served to allow plants to grow and produce its food for collecting. Reflecting back to this years harvest, it has been a good year and the garden produced plenty of food as I had planned during the early spring.

It is time for me to get it cleaned up and till the soil over to turn in the skeletons and the last of the vegetable plants and the weeds that I allowed to finally win their space in the garden as it didn't seem important to pull out any more. A time does come, as a gardener, to just realize the garden is at a point where weeds can be allowed to grow.

A custom mixture of my own Grains and Legumes have been mix together and are now ready to be planted and allowed to grow before the winter snow comes. It is important to plant green crops so that in the spring it can be tilled in and nutrients from the green crop like nitrogen will be present. Side by side with my brown leaf compost that I will start building this fall, my garden will have a wide range of organic food to base my garden off of next year. Along with Chicken poo and cow manure, my garden will grow well again next year.

Here is a great mix that you can purchase already made for you. 


Friday, September 14, 2012

The Birth Of The Smoothie

There are a few dishes that sit on my table today as did when I was a child. It is sometimes wonderful how we relate food today and the memories from our childhood, sometimes it isn't.

Traci, my sister can correct me on this one, however I am sure it was in October of 1978. We lived in a shanty in a small town in Clarksburg Pa. It was once a sturdy home, left to time and rented without up keep. The coal door still opened as we would feed the coal furnace from the basement and the coal truck put coal through that door. I doubt that at any time in life of that house was it ever warm during the winter.

I had returned from shoveling coal into the furnace as I was told to do, steam in the air, windows covered in condensation, the old brown TV with a fuzzy picture of the evening news was on. Traci and I often peeled potatoes as well as help Mom prep dinner as she had a full time job.

Dinner time in our house was that, all the family come together, sit, ask for people to pass around stuff. It was a Friday evening and Bobby's two children spent that weekend with us. So with 4 children, when Mom shouted dinner, the whole house seemed to rumble and shake as we made our way to our seats at the table. But this night it was a quiet "drag" to the table.

It isn't my fault if your having your own flashbacks by this time, perhaps, but let me tell you more.

Bobby and Mom thought a good meal was a meal where you would have to eat stuff that children think is gross. It doesn't matter how it was cooked, it was just nasty. Bobby's pick that Friday's meal, saute' liver and onions... with mashed taters...

I tried for an hour to climb my way through this meal, it was nothing smaller than Mt Everest, and almost no place to drive my fork in. It was cold and harsh, but Mom just kept pushing forward... Your not leaving that table till your plate is clean.. I remember listening to the clock tick as if minutes were hours...

As  time past, I was alone in the kitchen while every one else fought for a spot to watch TV. Mom went in and put her night gown on... I knew better to waste the food, that is the real reason I didn't try to out smart my way through it. I wasn't a very clever child either and knew I faced a spanking or worse if I did get caught. Then, with a sad face as I looked at her, she said right....

Mom was a War baby and was raised by her Mom and a nanny as the story was told to me. So she had some of that hard liner and dry humor about her that had been caste into her as a young child by a Brit Nanny.

The blender was pulled out, she grabbed my plate, scrapped it into the blender, she came back and grabbed my golden Tupperware plastic glass which was filled with whole milk. In it went like she was a master chef creating a master piece... The blender bogged a few times at the start... than it ran...

She filled that same glass up, placed it before me and ordered me to drink it. I did so in total fear that she was about to become a monster.. Than she filled it up again until the blender was empty, again she ordered me to drink it, but this time my gag reflexes were about to explode. I lifted it up slowly, and couldn't get that liver infused milk drink taste out of my mind. I was crying and begging my way out of it, but I was stuck...

So the birth of liver and onions smoothie was born... The taste test didn't do so well, so it never became a popular fade diet or smoothie...

PS Please look at the labels I have attached to this post....


Saturday, September 1, 2012

The Old Canning Jar Project, Be A Interesting Host

I want to get right into it, and I am willing to share the links after we stroll through the project so you can get those products if you want or bookmark this page to follow up on a later date.....

So I only had a few jars that I could no longer use for canning, I donated the other two to make this project practical and fun. I did this project outside....

I started out with a few different jar sizes, but they have to be widemouth in order to make this project work.


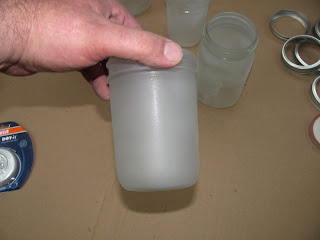
I know the original idea, no I didn't make this up, had said to spray the outside of the jars, but the flawed idea behind that is that you can only get Interior Frosted Paint...


So I decided to spray the inside after I tested it on the outside where it was exposed and scratch very easy. I jumped in and started spray and the runs showed up. So I lightly sprayed the inside a few times.


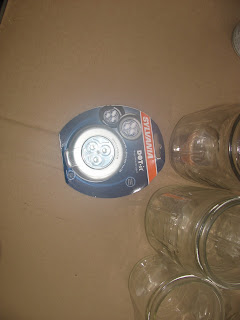
I let them dry and opened the lights, I got these on the fly from the Flea Market last week, but I discovered even cheaper ones that function even better and have more lights. Well that happens sometimes, and I will share that link with you.


So I opened them by twisting them apart to locate the two sided sticky tape and remove the pull tag so they will light up.


I pulled the tag, removed the double stick doughnut.... I twisted the light back together and applied the double sticky doughnut to the back, and removed the protective tape on the other side.


I took one lid and fastened the light to it....


I did this for the rest of my lights.... So I had to test them to see what they looked liked, even though it was daylight....


Pretty dang cool looking... So to save the photo by photo, let me explain, this is a great idea. You can Host a party and have these so people can see a path, see steps, use them to draw attention to a nice area on your property during a party, boundary lights, use any season and have one on the night sitting table....


Tuesday, August 14, 2012

Ѽ Modern Pioneer's Original Apple Chip Recipe Ѽ

 With all the recent request for my Wonderful recipe, I decided to blog it..

Modern Pioneers   Ѽ Ѽ Apple Chips Ѽ Ѽ
1/3 cup Cinnamon
1 cup cane sugar
nice pinch of Allspice (heavier pinch if you want the taste to lean towards Apple Pie)
Pineapple juice
7 pounds of choice apples (use sour apples for sweet/s
our chips)

I use two thicknesses, just over 1/8 for crunching chips, 3/16 for less crunchy. Cut Apples into desired width, placing the fresh slices into the pineapple juice until you fill the bowl. No need to soak them as they just need to be coated with the juice. the juice has vitamin C which will protect the color.

Mix the Cinnamon, sugar and allspice together blend well. Sprinkle over apple chips already placed on trays. Then dehydrate until crispy ( ⌚ 8-14 hours)

If you want to omit the sugar altogether you can do that but the flavor will be much stronger, and I agree healthier as well. You can do this in a oven, but I am not sure how that would work.


If you want to make some really different fun chips, consider getting a spiral slicer like this one. Great for other dishes as well.

Thursday, August 9, 2012

Re-Claiming and Makng Useful Stuff (Pictures)

There is a lot to be said about keeping things you "might" use in the near future, then comes along the rules of how long to keep it. I know on at least a half dozen times, I have stuck to the rules. But wouldn't you know it in the near future I would need it. Sometimes, that is my luck... So I decided how rare or how many things could I use it for and what was the chance I was going to include it in a project.

I had some manure delivered a couple years ago, and the driver backed into my gate and crushed it, breaking off the post it was attached to. After bartering, I got another load for free and replaced the gate but I held onto the crushed one.

It was a 12 foot gate and too large to store, so I cut it down, did some tree pulling on it to pull out the bends as best I could. I attached a come-a-long with a strap around a large wild cherry tree and the other end to another big tree. Using a nylon industrial/farm strap, I positioned it several times along with the other strap to pull out the kinks. Some I couldn't get out, some I just repaired.

After I repaired them, I stored them away in my out building for a few years. They were out of the way because I hadn't remembered them until I needed them. When I built the new coop pen, I used both of the now two parts for entrance and exit gates as you will see.

 So each gate would have been around $70 retail or more, and the installation went quickly. 


Now the finished product is keeping my Silky Roo in with his girls and the critters out!


Sunday, August 5, 2012

POOW__TAT__TOE Dehydrating


This food has long been the staple in many parts of world, and I believe has saved lives as much as ended lives. Stupid people are still building and shooting each other with potato guns. Then there was Black 47 in Ireland, again the source of people dieing and starving because crops were wiped out.

One of those frequent questions I am asked about is how to do potato in a dehydrator?

Lets talk about uses, and the first would be to make your own Scalloped Potato oven dish... Then there are skillet potato's, trail potato dishes, and they are light and store really well. They are really affordable and come in big ole bags that you can just dehydrate for a week and turn a 100 pound bag into 25 pounds of goodness.

The process is simple to address, but I suggest having a food slicer as you will be able to get lots done in a short amount of time. If all you have is a mandolin slicer, use it.... I clean them well and leave the skins on for nutritional reasons.

Get a bowl of salted water beside your work station, fill a vessel or sink with cold water add ice, put a pot large enough to dump your potatoes in on the stove on high, salt it as well.

Slice your potatoes just about 3/16 of an inch thick and place them in the salted water at your work station. As you slice the potatoes, place them into that bowl making sure enough water to cover them. Once you have finished them take them to the stove and put into your boiling water. Watch the water as it heats back up. Once it returns to a small boil, boil for 6 minutes, stirring gently and often to separate the pieces, drain and place into cold water right away. Rinse then one last time and rack them into your dehydrator and dry them until hard.....

Pictured here on the right as they are temporary place in a zip storage bag next to a box bought big manufacturers product, which looks starch white and unnatural to me. A few years ago I bought a box sample from Harmony House Foods, which is one of the largest dehydrating companies in the world, and mine looked just as theirs did. So don't get all worked up over the less white look of your potatoes, unless they look nothing like mine.   
Barry Farm does sell a dehydrated cheese that you can buy pretty cheap and make up your own recipe or use mine. Either way, this will be a rewarding dehydrating project/food store.


Saturday, August 4, 2012

Chicken Popsicle Hydrate Them With Water and Scraps

In the hot, dog days of summer, I am canning outside trying to keep the house cool. Nothing says farm work to me like a glass of cold Iced Tea, touch of lemon and just a tad of sugar to take off the bitter edge.

As a child we always had water and goats milk, but goats milk had it's place, and Iced Tea... Come in out of the garden, bailing hay, farm chores or fields, the cool glass of iced tea hit the spot. It still hits my memory buttons like it was yesterday.

Chickens are no different than hard working homesteader or farm hand. They aimlessly wonder to forage for bugs and find cool places to get a good dust and cool off. Their feathers keep the heat in and they need to keep cool.

So, you can keep your veggie scraps, chop them up, and add them with water into a flexible plastic container and freeze. I like to add a little scratch just so they know I love them. From green bean ends, swiss chard, blueberries, blackberries, squash and even tomatoes. Over rip strawberries in the mix makes my girls go nuts....


Wednesday, August 1, 2012

Report: Mushroom Log Project

With the drought in full swing, I have had other worries on my mind other than my mushroom log tower. In the spring as it came in, if that's what you want to call it, I checked my logs after every rain. Time and time again I left thinking maybe soon.

As it sat on my mind from time to time, I became discouraged. I spent about $32 dollars and made a lot of effort to complete this project. I don't like wasting time or energy let alone money out of my self sufficient fund. Mark, would remind me to check my logs after he found some on his... It was a constant reminder that I had failed that project. My research, when I did the project had slipped my mind this past spring or the negative just masked it.

So I went to the farmers market and a man was there with a table full of Shiitake mushrooms, we began to talk and we covered the same conversation Mark and I had the day before. Then I decided to take what I had learned, what Mark and I talked about as well as the man at the Farmers Market and put it into action.

So Saturday, Joshua and I took the logs to the pond, lashed them together, and plunged them into the pond. Sunday, after church, we took them back out after a 24 hour soak. At first they just seemed water logged, so we continued to stack them up and I would return Monday to check them out.

Monday came and I forgot to check on them, so yesterday I went up and checked on them again. Oh, I had hoped that they would show signs of mushrooms growing, but I didn't want to lift my spirits to high so when I was disappointed I wouldn't have far to fall back. Life does that to us from time to time doesn't it?

So as approached the pile I saw something, a small round light brown looking thing... I had a closer look... Well, what do you know it WAS a mushroom. I quickly looked all the logs over... and they were EVERYWHERE!! I was so excited, I started to count them, then I saw two growing from one hole, I thought " hmmm reminds me of a double yolk egg... cool ". A brief few photo's, and off  I went to the house to make an announcement. I did and everyone was like "good for you", Jessica said "gross, I hate mushrooms", Josh walked out to have a look!!!

So here it is Wednesday, and here is a few photo's of my rewards.... But first, I gotta say this.... YES another self sufficient skill done!!! Off the SS BUCKET LIST!!


Thursday, July 26, 2012

How To Process More Tomatoes and Make Seedless/Semi-Seedless Jams

I am ready to still continue making my own food if power is lost for long periods of time. I know how and have the proper equipment to manually prepare my own food for long term storage. But for now, I have power and I have lots of fruits and produce to get through.

Using technology to help you sustain a self sufficient life isn't a bad thing, and because you use it to help you doesn't mean that your not doing it right. Sure, some people might say "well that isn't the way it was done/you can do it a more primitive way" and most of the time their right. But you know what? We are modern pioneers, not pioneers without the tools available to us to use.

Go back 100 years with a chainsaw and ask a Lumberjack yielding misery whip to fall a Redwood in Oregon, if he would like to try your chainsaw. After he uses your chainsaw, you would have to shoot the guy to get it out of his hands. Maybe it is just me or perhaps you think like I do, it is just common sense to use what you can to help you. I got a Kitchenaid stand mixer some years ago, the the fancy high end one. I had picked it up for a few hundred bucks. I started to use it to make bread dough and mix other things when I could.

One day I went into the store going to check out the attachments that I could use to make more use of mine. So there it was, the one thing I needed the most... The Kitchenaid strainer attachment... My mind started racing like the dad did when he opened the box and saw the leg lamp in the movie Christmas Story... It was amazing to see it there, and it drew me in and I didn't care about the cost. I was drawn in by all the uses and how much time it was going to save me... so I bought it...


I got it home and started to make jam the following morning, Raspberry to be exact... It was too easy... The berries went in, filled the hopper, pressed down with the tool, juice and pulp drained down and the seeds and other stuff came out the end. That was it, that easy...DONE!

 A bright light appeared in my kitchen that day, it was the time saving idea light... I had finally found the one item that would save me THOUSANDS of HOURS of intensive labor to process berries and tomatoes. I can do a bushel of tomatoes in under an hour, that is from washing, cutting and processing them for canning. Now that I have this, I use the time I save and my shoulder for other projects that need attention.

I don't know about you, but some jam like Blackberry/Raspberry can have way too many seeds for my liking, but at the same time they don't feel like homemade jam to if there isn't some seeds in it. So I dump one big tablespoon back in each batch I do.

Trust me when I say " don't let the price fool you, it's well worth the investment ". If by chance you don't have a Kitchenaid mixer yet, get one!!! I love mine!!

Saturday, August 6, 2011

Dehydrating, Dealing W/ Bumper Crops, Secret Tip, The Recipe

This time of year most folks love to share the fruits of their labor with others. So many people bring in food from their gardens and give it to co-workers and such.

NOT ME!! If you now suspect that I am just a grumpy old man, that isn't true. However, I do like to share some of my food with others and love to fellowship and share with certain folks. I process all my own food, and I deal with my bumper crops differently than most people.

Some people do get what I am doing, and I gave a friend some Jam, only to find out they didn't use it because it was home processed. I know right? But it was the first time, and the last I shared my food with them.

This time of year, its Cukes and Squash... I know that mater time is just around the corner when bumper crops of these two veggies head for the dehydrator. Cukes have tons of canning ideas, my focus in this article is Squash.

Zuke and Yellow are two of the most produced squashes in gardens. People love to grow them with little to no care, plant the seeds and off they go. I find that most people give away squash and maters, and from time to time Okra. NOT ME!!!


You know by now I love to process and store my own food, and you want to learn from my adventures and share your own ideas. To prep my squash, I clean it, cut the ends, and set my slicer for 5/16 of an inch. Now it is not wise to dehydrate big squash without a little bit of work, but armed with an egg cup, you will now be able to store and keep more food than you ever knew.


Yes, for this article I am going to use the word pith, it is the only word I know that I can described the center of a squash that has mature seeds in it. Now, having seeds in dehydrated food isn't a crime. The criminal here is mature seeds. Seeds are self contained units, and if activated, will ruin mass amounts of food stores. Now if your storing them for seeds that is different, as the end use is much different.

 Allowing mature seeds to be left in can not only ruin food, but also contain natural chemicals that will off set the flavor of your food. So armed with a egg cup, I remove the pith and mature seeds so that I can continue to save the squash for dehydration.I put up 23 pounds of squash in one go using my Excalibur 3900.

Some will say this recipe has been in many families recipe book for generations, as for a modern pioneer, our methods of food storing do change when a new way allows for better food storing. With that, food recipes and the desire to make our own comfort food makes us change our recipes to adapt to our new ways.

I am positive some of you growing up on a farm have spent many summer nights at the table with a bowl of squash mess. I know this time of year it was a near staple fixed on the grill in a cast iron pan over hardwood fire. We never cooked inside unless it was early morning in the summer. So I gave my hand at making this recipe with dehydrated food. After trial and error, I have developed the recipe and process.

11/2 cups each of dehydrated yellow and zuke squash
1/4 cup dehydrated onions
dehydrated garlic to taste
2 1/2 cups of veggie stock or chicken
2 tablespoons of butter
3 tablespoons of flour
salt/pepper to taste

Put stock in fry pan, add squash, simmer for 20 minutes over medium heat. Increase temp to high, cook off remainder of stock liquid, turn back to medium, add butter, when squash begins to turn brown add butter, when butter melts add flour and return to high heat until the flour is brown.

I tested this recipe throughout the winter making as many as 8 to 12 side dishes. From the first to the last, outstanding!!