In my youth, still young to many at 44, I found that I had a drive that was matched by few. Only true people that had the same passion as I did could even keep up with my task. I pride myself on doing more than people expect of me and showing/sharing the fruits of my labor.
Like planting a garden, all the prep work that goes into it, the rewards come later. We live in such a society where people want it, want it now, and if they don't get it... Well you know....
With nearly 10 cords of hardwood split and stacked, my hands are sore, and each day I split a little more. It is a homesteading rule to do things, and I mean all things with pace. A pace makes it sound like I want to put things off or stretch them out over time as if I were lazy. But I assure you, that isn't the case.
I make rules with myself, rules that allow me to do more over a longer period of time without getting burned out to quickly. Sure, when push comes to shove I will double hands down and burn the midnight oil if need be...
So one of the rules I have is to split one wheel barrel or two a night from the second week of August until I have at least 9 cords completed. I split about 6 cords by hand, and the rest I will use a machine. This rule falls to many things here, do a little each day...
There are times when we must demand more from ourselves than normal, but I have learned to do more in each season before the next. It helps so much not to try to do everything that needs to be done in the season.
Showing posts with label practical homesteading. Show all posts
Showing posts with label practical homesteading. Show all posts
Tuesday, October 14, 2014
Monday, December 2, 2013
Seasoning Your Cast Iron, The How To Facts
Like anything else, there is different ways to accomplish the same goal. Although what I am about to explain to you is the correct way, it might not be the same way you know. Also we are not going to tear this whole process apart, we are going to keep this process as simple as it was done a few hundred years ago. Like they say, if it isn't broke why fix it?
In order to clear the slate for a good conversation, let us get straight into factory seasoning. Any good quality cast iron will arrive pre-seasoned. It is ready to use out of the box, a light rinse and your ready to start using it. Over time a non-stick surface will form, which brings us to the golden rule, never, ever wash your cast iron with soap, dishwasher or scrub it with steel wool... I strip all my new (even to me second hand) cast iron down using Kosher coarse salt and a lemon cut in half. With a little elbow grease, you'll be done in no time. If you desire to keep the factory seasoning, that is fine too.
Let's get to the small affordable list of things you're gonna need prior to seasoning your cast iron. A disposable aluminum pan large enough to set your cast iron into while it is seasoning and a tub of lard. Yes, pig fat... You can use a veggie based white spreadable stuff, but stores still carry just plain old lard, which is the best thing to season with.
Pre-heat your ovn to 350 degrees, okay let me stop here and pass along a note. Some will say you have to pre-heat the cast iron prior to seasoning. That isn't true, the concept in theory is there, but I have been working with metal all my life and we are not annealing, we are seasoning. Annealing is a whole different blog post... The whole open pore concept isn't necessary for seasoning.
Get out your Lard, open it, and just stick your hand in and grab a big ole glob of it and start to smear it on your cast iron, all over, don't miss a single spot... Go ahead and to the lid to the Dutch Oven as well, smear it all over it too... Place on your disposable pan, place into the oven for one hour.
By this time you're wondering if it will stink, yes a little. Anytime that it gets too much, if it does, just open a window or door to vent. After an hour has passed it is time to remove the cast iron and let it cool to room temperature and repeat at least one more time, two more times is best at this point, but one more will work.
Over time, using your cast iron, and washing it only with hot water and a brush, a non-stick surface will form. Never use metal utensils unless you have to, just use a little care when using them.
From time to time you may need to season your cast iron again. I once knew a woman by the name of Nancey, she had a cast iron skillet that hadn't been washed with soap for 60 years. Her skillet made some of the best fried trout I ever ate, better than my own and Mom's.
If your looking for a great deal on a starter set of cast iron, here is a great deal!!!!
Saturday, November 30, 2013
Keep Close to Nature's Heart...
Keep close to Nature's heart... and break clear away,
once in awhile, and climb a mountain or
spend a week in the woods. Wash your spirit clean.
John Muir 1838 -1914
I find that seeking out moments with nature have to be not only on her terms, but when she wants to keep her beauty close to her own heart away from prying eyes. She keeps her beauty protected for those who seek out to see it and that are there just for that moment and time.
Passing through a field, I see the plants, flowers and seeds. When I look at the woods or while walking through the woods I see the trees as a part of my life for that moment. I look at their form and shapes, their limbs and leaves as pieces of art.
As I sit in a spot I look and see everything God has provided us in our world. If you think about this a moment, as you sit there and watch the leaves fall, you are seeing in your life a moment of time that will not be repeated.
Yesterday I took a trip into McConnell Mills State Park after the big ice/snow storm pushed through. People had already adventured into the key locations before I made time to go there. But I knew a few places others wouldn't venture into and I could go there and sit and reflect on the sounds and beauty.
The storm had left behind a glass covered forest, as the trees were covered heavy with ice and snow. I sat along the river and listened to the water rush by. Knowing the ice would leave it's toll, I could hear the stress of the trees as branches could be heard crashing down.
As the wind blew ever so slightly, the sound of the cracks of branches could be heard like wood in a fireplace. The pops and cracks would sometimes be followed by big crashes, and other trees would begin to crack from the wind and sound. I sat there listening to this being played out all around me, and I was thankful to be able to go to a place where the scenery was so different from my own mountain spots of the homestead. The scenery and sounds always seem so much more defined and louder in new places as you visit them.
I left these photo's as large as I could so you can look at them and see how they make you feel. This is what I saw around me as I ventured into the park and took in all that was around me.


Wednesday, October 23, 2013
Hardtack, The Recipe and Practical Uses
As I walk you through making Hardtack, I wanted to show some pictures of the process but I want to tell you a little bit more about this staple.
Hardtack has been made and used for centuries by many types of people including Sailors, Pioneers and Travelers. It is a type of cracker, that when made properly, can be stored and last forever. On its own, it can be eaten once softened. It was often dipped and used in broths, soups, stews, beans and coffee.
HT can be carried as long as it stays dry, it can be useful. It stores really well in air tight containers and in the dark. You can use basic flour, wheat flour and for this small batch, I ground my own Wheat. You only need water and salt from here. As you can see, I made a small batch, but I suggest that you double up the recipe and make double using the same amount of energy.
 Mixing 3 cups of flour, you can mix 2 cups of white and one cup of Whole Wheat, all white flour, all wheat flour, whatever suits your needs. Adding 1 cup of water or so to make a tight dough, and 3 teaspoons of salt. Here I kneaded the mix and formed a ball.


 I separated them and placed them on a cookie sheet to bake at 350 degrees for a half hour, flipped them over and continued to bake them for 30 minutes more. The general rule to tell if they are done is that they should not be soft at all, hard as a rock they should be.

Hardtack has been made and used for centuries by many types of people including Sailors, Pioneers and Travelers. It is a type of cracker, that when made properly, can be stored and last forever. On its own, it can be eaten once softened. It was often dipped and used in broths, soups, stews, beans and coffee.
HT can be carried as long as it stays dry, it can be useful. It stores really well in air tight containers and in the dark. You can use basic flour, wheat flour and for this small batch, I ground my own Wheat. You only need water and salt from here. As you can see, I made a small batch, but I suggest that you double up the recipe and make double using the same amount of energy.


I rolled the now formed dough out after kneading it to form together.

I grew and ground my own flour as you see here. I rolled it into 1/2 thick piece.

I trimed the edges, set them aside to for and make more and began to cut them into 3 inch squares

After cutting them, as you can see they don't have to be perfect at all. Using a small skewer, I poked a bunch of small holes in them, but not all the way through.


Here is the final product!!!
3 cups of flour
1 cup of water
3 teaspoons of salt
Bake at 350 for 30 minutes one side, flip and continue for 30 minutes until hard.
3 cups of flour
1 cup of water
3 teaspoons of salt
Bake at 350 for 30 minutes one side, flip and continue for 30 minutes until hard.
Thursday, October 17, 2013
Beam Making, The Bridge Project
When I started to plan the second bridge project, I took everything I learned from the first build, and applied it to this project planning. The first bridge, still standing and handling people and equipment traffic, had its flaws and bad approaches.
Nothing in Homesteading is perfect and learning as you go is a tough way to get things done. However, it sure makes for a learning curve that is not soon forgotten. Building my first bridge, I used lumber that was left here from the old home built saw mill that once occupied a space above the pond. When I dug the holes to put in the main supports, I used a string to aline the post and holes. Over a 20 foot span, I missed my mark by 3 inches, so cutting the lumber to fit properly took twice as long as it should have and the boards had to be custom cut and fit in.
Have the out building that I use to dry some of my food such as beans, onions and garlic has its advantages. Split in half inside, one side has woodstove and the other has a force fan which pushes heat to that side and has a electric 220 volt heater as well. The woodstove side also has a evaporation hood to vent out the moisture when cooking down sap during sugar season. As a manufacturer of copper range hoods, that skill has helped me along with the vent hood.
Sixteen months ago I fell a couple of Red Oak Tree's on my property. I set them on top of some other logs to season. Partially seasoned now, I have started to cut them and will allow them to un-stress and normalize as the seasoning process continues inside the out building.
Once inside, after I finish cutting the beams to 10 x 10 x 12, I plan to control the moisture level and hang the beams 7 feet off the ground to the ceiling to take advantage of the heat. I fire up the woodstove a few times a week keeping it going during the weekend, I maintain a temp of 65 degrees. The idea is to control the moisture and allow the beams to twist, crack and do what they will do before the final cuts and building with them.
The final cuts will be made using a tried tested method, using an Adze. So lets take a look at the preliminary cutting of the beams. You can see the quality of the wood now that I have cut into it. Although these are not yet seasoned all the way, I am using a approach that I have in the past that I know will work and produce a high quality beams that will be the running beams for the new bridge.


Although this project will be done in stages, I plan to blog and share lots of photo's in the future so that you can better understand what I am doing and my approach.
Thursday, November 1, 2012
The Cash Storm, Homesteaders Freedom...
With the warm coals from the hard wood fire, I sit in my warm house wearing my smiley faced pj bottoms and my traditional plain white T on. As the storm Sandy finally moves away, what is left in her path is beyond words, however lets take a closer look.
Held up by the force of wind, I once stood in the wind gale of a down graded category 3 Hurricane. As a natural entrepreneur minded man, I gather fuel, bar oil, sharpeners, chainsaws, straps and come along's, timber jacks, ropes and cash. As I had already gathered basic 3 week supply of goods to take care of my family I was ready... As we sat in the eye for almost 15 minutes, I was already to get going.
Perhaps you might think that I was going to take advantage of people and charge outrageous prices to remove tree's from dwellings and other places... No, I was however using my money and skills to make money and provide people with a service. I made money after the hurricane moved through by having the tools and supplies on hand to get the job done right away as people wanted to get back to normal. I never charge to much and did dozens of jobs for what the people could afford or had on hand. I even bartered for some stuff....
As a young man, poor, I was always searching for new things to adventure into as long as I could benefit from it, and I enjoyed it, why not? I am positive this type of attitude of moving forward has helped me with running my own businesses as well as the risk of doing that. But Hurricanes and big storms always put a little green in my pocket. There was risk doing what I was doing, but I felt a need to take care of my family, money in my pocket insured I could buy supplies.
A few years ago we were hit by several big storms back to back. We had snow on top of snow on top of snow on top of snow... At one point, I had walls of snow that lined my driveway. But I didn't need to do as I had done before, nor was this storm any different. However perhaps my age now, maturity, knowing better, or just a more confident approach in getting through these types of natural events.
I remember sitting in the eye of that hurricane, in the dead still of air, looking at the coming wall, did I do the right thing and could we handle another 6 hours of this? We did in the end, but it sure was tough and scary. I thought I had 3 weeks of supplies, they lasted only a week.
As I sat here the other day while Sandy raged on, I thought about those days when I thought like that about money..... Today, I am just prepared for months if need be and I didn't go out of my way to do anything special. I don't feel like being in a panic to run to the store to buy supplies other than toilet paper. If I don't have a tin can of food, it doesn't bother me.
Being self sufficient has given me a confidence that I never knew it would. Sure you can say, well of coarse silly, but I can't explain the feelings of confidence I do have. I feel like we could be stuck here and we would survive and be okay. I know tons more about hunting, gathering, gardening and life skills. I feel like I could write a book and teach others the way I have adapted to this life of rewards and freedom. We that Homestead, step in and post a comment if you do, we have a sense of freedom others do not know or understand....
It compares to something like a right of passage, something you have learned and lived and now you can confidently execute the motions without thinking or worry...
By being self sufficient as I want to be, I think if the stuff hits the fan, we will be okay... That is a good feeling....
Sunday, October 28, 2012
Holding a Value System For Everything Homesteading
As a Homesteader, I find that there are many different challenges to life that are expected and there are the ones that people just don't think it is going to happen to them. When they do, they almost always catch us off guard. Sometimes when our plate is already filled, it piles a little higher. Just when you get the plate clean and everything seems to be going well, it hits us like a lead balloon.
Many years ago I adopted many ways of life that could be considered Pagan and perhaps a little Hippy and over the top with Earthly love of the world and for others. That word "others" pertained only to those who were my friends and swung my way. If you weren't in with me, than you weren't part of my life and so I didn't care about you.
As I got older, I started to understand more about my way of thinking of life and all that is in this world. I began to go back to church. As I live my life now, headed to whatever comes my way, I find that keeping a value system in place keeps a balance in my life.
Many things I do I work close to God and all that he has blessed me with. People might not understand this part of me. There are many others just like me, people who love others, love the earth, respect animals and humans alike, and love the Lord for many reasons.
There is a value system for me, everything has value. From weeds, plants, trees, insects, animals and other humans male and female alike. I do my best to start with a heart of love, a heart filled with understanding... At times this seems like the hardest thing for me to do, but I do try.
The reason I am mentioning this in a blog because while your riding with me, remember you are riding with me... I have a value system and a balance of love for everyone and everything including God.
If your here just for the pioneering self sufficient ideas your gonna have to take my love for the Lord as well or you might leave me like a bad habit. Either way you decide, I am not going to change who I am or anything about me for you. These are my pages and I am glad your here, but don't tell me to stop mentioning the Lord from time to time.
This is a package deal, take me as I am....
Saturday, October 20, 2012
Raw Milk Turns Into Many Homestead Products
As I sit here this evening, while the cool fall air swirls around the trees to pull off the dead leaves and floats them to the ground, today was a good productive day.
You might remember the other night I went to a secret location and got some raw, right from the cow, milk. Now before you start posting your thoughts of how bad raw milk is for you, I will not listen to your nonsense. Your wasting your time preaching to me about all the things bad with raw milk, and if I wanted to waste my time I would combat and debate the issue with you. But I am not going to do that.


As I used a method taught to me by my Mom, I had confirmed the technique of separating the cream from the top of the milk. So out of the milk I got I ended up with enough cream to make nearly three pounds of butter. You see I dodged that "how much cream did you get" bullet? I didn't measure my cream as I should have because I forgot to and just moved into butter production first thing this morning.
So, I know your ready to get into the whole butter production, but I wanted to let you know in my useful gadgets I have a Mixer Stand like the one I used to make my own butter. One of these days I am going to blog a list of stuff I make with my Kitchen Aid stand mixer.
So I started out by allowing my cream sit overnight and then just chilled it a couple hours. I added some into the stand mixing bowl, and kept adding until the mixer was going on high and I always make a foil bonnet around it to keep it full.
.jpg) So as it starts to churn, it will thicken up and the milk and as you can see in the photo below, the level of milk has dropped compared to the one above. Generally I just keep adding cream until I get enough where I know my machine can handle the butter.
So as it starts to churn, it will thicken up and the milk and as you can see in the photo below, the level of milk has dropped compared to the one above. Generally I just keep adding cream until I get enough where I know my machine can handle the butter.

So by adding foil around the edge, tucking it in, I can fill my mixer up pretty full without spreading milk all over the kitchen.

Taking a peek in, can you see the noticeable change it texture and color?

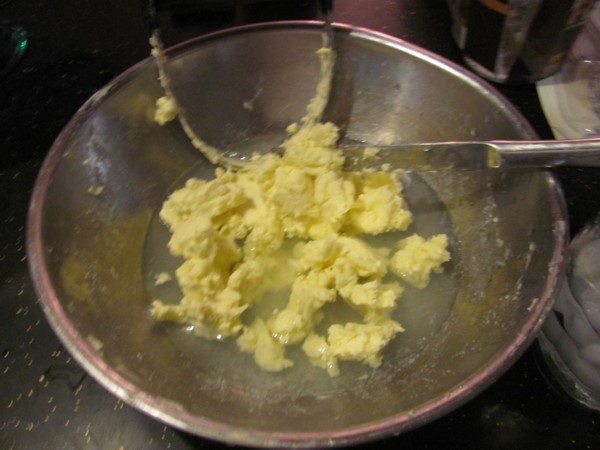
Well it won't be long until my butter starts to clump and balls together. When it is at this point it is time to take it out and strain it.

Now it is time to start cutting the butter, if you don't cut it, it will become rancid very soon and you have wasted all your cream, time and effort. Cutting the butter with a pastry cutter and cold water will clean out all the residue milk that has been collected during butter making process. Ice cold water added, than cut it for a couple minutes, strain add new cold water, and repeat until your butter cuts clean in water. I use 1/2 cup cold water during my first cut and mix that with my buttermilk. The remainder several batches after the first one I toss out.


This is my last cut, clearly from the first photo you can see the water color get much clearer.

Now I will strain the butter one last time and begin to press it into containers for long term storage. Notice the water coming out?

Don't be afraid to poke your fingers down into the butter to remove the air pockets and the water will also continue to come out. Now it is time to smooth it out for long term storage...

Some advice, never share your source for raw milk by bragging about it, share with people you know if the farmer allows it. Make sure to visit your farmer and make sure they are a clean milker. If your lucky as I am, mine doesn't use hormones and mine grazers and produce organic milk for the market.
So tomorrow for breakfast I will have homemade buttermilk (made from my by product from butter production) pancakes with my homemade butter covered in my homemade maple syrup.... I feel pretty proud to say all those homemade words in one sentence....
You might remember the other night I went to a secret location and got some raw, right from the cow, milk. Now before you start posting your thoughts of how bad raw milk is for you, I will not listen to your nonsense. Your wasting your time preaching to me about all the things bad with raw milk, and if I wanted to waste my time I would combat and debate the issue with you. But I am not going to do that.


As I used a method taught to me by my Mom, I had confirmed the technique of separating the cream from the top of the milk. So out of the milk I got I ended up with enough cream to make nearly three pounds of butter. You see I dodged that "how much cream did you get" bullet? I didn't measure my cream as I should have because I forgot to and just moved into butter production first thing this morning.
So, I know your ready to get into the whole butter production, but I wanted to let you know in my useful gadgets I have a Mixer Stand like the one I used to make my own butter. One of these days I am going to blog a list of stuff I make with my Kitchen Aid stand mixer.
So I started out by allowing my cream sit overnight and then just chilled it a couple hours. I added some into the stand mixing bowl, and kept adding until the mixer was going on high and I always make a foil bonnet around it to keep it full.
.jpg)

So by adding foil around the edge, tucking it in, I can fill my mixer up pretty full without spreading milk all over the kitchen.

Taking a peek in, can you see the noticeable change it texture and color?

Well it won't be long until my butter starts to clump and balls together. When it is at this point it is time to take it out and strain it.

Now it is time to start cutting the butter, if you don't cut it, it will become rancid very soon and you have wasted all your cream, time and effort. Cutting the butter with a pastry cutter and cold water will clean out all the residue milk that has been collected during butter making process. Ice cold water added, than cut it for a couple minutes, strain add new cold water, and repeat until your butter cuts clean in water. I use 1/2 cup cold water during my first cut and mix that with my buttermilk. The remainder several batches after the first one I toss out.


This is my last cut, clearly from the first photo you can see the water color get much clearer.
Now I will strain the butter one last time and begin to press it into containers for long term storage. Notice the water coming out?

Don't be afraid to poke your fingers down into the butter to remove the air pockets and the water will also continue to come out. Now it is time to smooth it out for long term storage...

Some advice, never share your source for raw milk by bragging about it, share with people you know if the farmer allows it. Make sure to visit your farmer and make sure they are a clean milker. If your lucky as I am, mine doesn't use hormones and mine grazers and produce organic milk for the market.
So tomorrow for breakfast I will have homemade buttermilk (made from my by product from butter production) pancakes with my homemade butter covered in my homemade maple syrup.... I feel pretty proud to say all those homemade words in one sentence....
Saturday, September 29, 2012
The Meal, Pioneering With Children....
As a child, we as a family would go camping and fishing along the river banks of many rivers in two states. As we traveled or stayed at camp, we had sandwiches during the day but we always had breakfast and dinner on a open fire cooked in cast iron pots and pans. Often these meals were one dish meals..
Sometimes during the day we had to gather firewood for the fire that needed to last through the night. We tried to always keep a clean camp, but you know how that goes. I remember sometimes rubbing dish soap on the bottoms of some aluminum pans before Mom would cook on them over the fire. But 90% of the time she cooked on cast iron. Fried taters were almost a staple for us as were many non meat meals.
We did have a cooler to cart stuff around and they would go to the store when needed to get stuff. I had many Dutch oven meals, chili and corn bread, stew and biscuits, pot pie, shepherds pie, cobblers the list goes on. Having a fireplace or a place in your backyard to build a fire, you can create a simple one dish pioneering meal with your children or even a relaxing date and change it up a little. But allowing your children or grandchildren to help out will create wonderful memories that they will carry with them all of their lives. After dinner, roast some marsh mellows or try my fav, roasted pineapple over an open fire....
So the next time power goes out, even if comes back on. Don't travel to the next town over, have a fun time cooking on a fire with your family or friends.
Thursday, September 27, 2012
Sharing My Resources To Help You Along The Way
After a few years of getting my homestead in order or to a place where I can spend more time on my blog and share my ideas and resources. I can finally sit down, start and play catch up.
My first goal was to start listing items that new homesteaders or people just moving into a more self sufficient life can use and identify with. We get so many emails, private messages and post a day about how to, what to use, and how to you find what you need. So I decided to sit down and put together a game plan. This approach has been thought out completely so that we can help you quickly and with the right stuff.
I decided to put the categories in a well defined order so that the first tab is the most important and the last not as much. I can't tell you how much reading can teach you. The gadgets are things you can use to help you process better, faster and with a more positive results than ever before. The seeds are from well trust sources that I have personally bought from in the past.
Starting out or continuing to move forward can sometimes lead to a road block, and we want to be able to help you up and get going again. We have a small, yet dedicated team that will share the correct information with you. There are times or circumstances that we get stumped as we know a little more than general information but not experts in any one subject.
With all the digital products coming out, we are working towards making sure this is a readable site to everyone. If your on a phone and want to see more options, click the down arrow to the right to see more options. Then the tabs will come up and go from there.
Feedback from our community is important so we want to be able keep communications open, and we listen to all suggestions and ideas.
When you use our resources and make purchases from Amazon when you follow our links, we get a small kick back which gets split three ways. I am on a 1099 so all taxes come out first, than we have a projects fund and then the giveaway fund. By supporting this page this way, your giving back to the whole community. After people started stepping forward telling me how much I am changing their lives for the better, I thought about the items we give away and how much they could help others live a better, more self sufficient life.
Supporting this community is important to everyone here, including myself and other moderators. All of our moderators are volunteers at this time. They are giving back because they love and enjoy sharing their lifestyles. We are also here to make sure that this is a friendly PG-13 level site.
Last but not least, Thank you for your financial support through the Amazon Program and a huge thank you for being a part of our community. Be sure to share us with your friends.... Peace and much Love Jason
Sunday, September 23, 2012
The Chicken Strategy, Chickens are Smart!!
Do you remember the story of wrong way Whooten I told you about when I was a child? Basically it was about a duck that was born around our pond, I believe in the end he was left by his familyu and was the only little duck left. Well, the fellow had a bad sense of direction like most men. So he swam backwards but walked forward, yeah go figure right.
So, ok, now I have a new story to tell you happening here on the homestead... LOL... Pretty good one too.
So out of the old flock we have two hens, one is still laying and one continues to peck at the others eggs and breaks them open. I have supplemented their feed and have done everything I know to keep her from doing such a thing. But she continues to carry on her hate until the other day..
The hens were shouting their chicken alarms and so we checked in on them. When the door was opened, there she was in all her glory.......
.jpg) So she has been pushing the lid off a few times, once we didn't put it back on because we never found any poo in there so figured we would keep it off.
So she has been pushing the lid off a few times, once we didn't put it back on because we never found any poo in there so figured we would keep it off.
She was safely removed from her troubled position being stuck in the top part of the feeder.... Then, to our amazement she was doing something pretty smart. She was protecting her eggs from the other hen that keeps breaking them open.

By laying her eggs down in the can, the other hen can't reach them to break them open. So, we decided to make a plan to test this theory to see if this was a self taught, survival of the species skill. Now a week later, she continues to lay eggs in there, but if filled up to much she will lay in the nesting box where the other hen continues to break them......
So, ok, now I have a new story to tell you happening here on the homestead... LOL... Pretty good one too.
So out of the old flock we have two hens, one is still laying and one continues to peck at the others eggs and breaks them open. I have supplemented their feed and have done everything I know to keep her from doing such a thing. But she continues to carry on her hate until the other day..
The hens were shouting their chicken alarms and so we checked in on them. When the door was opened, there she was in all her glory.......
.jpg)
She was safely removed from her troubled position being stuck in the top part of the feeder.... Then, to our amazement she was doing something pretty smart. She was protecting her eggs from the other hen that keeps breaking them open.

By laying her eggs down in the can, the other hen can't reach them to break them open. So, we decided to make a plan to test this theory to see if this was a self taught, survival of the species skill. Now a week later, she continues to lay eggs in there, but if filled up to much she will lay in the nesting box where the other hen continues to break them......
Saturday, September 22, 2012
Dutch Oven Cooking... Bread Making
As I walk down my path in life, I find myself coming in contact with
some real wonderful people. Some people like Stan, who does a lot of
teaching others, has a passion for his work. He isn't in it for the
money because he often volunteers his time for free. He doesn't lug
around a case full of trinkets to sell or a selection of fancy cook
books...
Instead, Stan carry's a couple of wooden boxes filled with a few pamphlets of bread recipes and tools to work his magical dutch ovens. A man that has walk down some rough roads in time, and has a humble attitude and is generally kind to every one. He enjoys speaking and answering questions and he really sets the tone for the class.
You can tell he is use to dealing with all different people from all walks of life... His steady teaching and answers really show off his teaching skills as every one stays focused on what he is sharing. Over the last two weekends I have spent time with him as a student. Even though I sometimes know what the task is and have mastered the task, it is always good to learn new skills from some one that has been doing it for 62 years like Stan has.
Stan is a regular volunteer at the Old Stone House in Slippy Rock PA where he also dresses and performs time period dinners that include the correct period of dishes, cups, clothes, manners and food. When you stop by and visit there (a awesome historical place to visit with time period decor and people to explain everything) let him know you read about his awesome cooking skills here.
Here Stan is explaining the basics of no knead bread, the type of bread that we cooked in the dutch oven. As he explains, he shows samples that he made that students will start working with.

While Stan answers questions, he over watches his students repeat the technique of forming the bread to get ready to place on parchment paper.

Now that the bread doughs are formed, they sit waiting for the dutch ovens to warm up and get ready.

Adding the coals over and under the dutch of, and there are some rules as to how many coals to keep the dutch oven up to what temperature. But the hottest coals always go under the dutch oven when bread making.

Some really hot coals that we started about a half an hour earlier in this quality chimney. Using a quality name brand charcoal ensures a more even burn when baking bread in a Dutch Oven.

Using handles made made when cutting out the parchment paper, makes placing the bread dough into the 425 degree dutch oven quicl and simple.

As the bread cooks in the dutch ovens, Stan takes the time to explain the charcoal heating process and different times and approaches to baking it.

A QUICK PEEK, and I mean quick to see it baking, and hurry uo and place the lid back on the dutch oven so all the heat won't escape.

Now, it is ready to be removed from the oven as it shows browning, the smell is wonderful. Stan says if it smells like it isn't cooking, it isn't. If it smells like it is burning, it is burning. If it smells like it is cooking, it is.

How pretty is that!!! Perfection using primitive methods just shows you how luck we have it these days, but also how easy it really is. This loaf of white bread is hot and ready for butter and honey.


We also made this wheat bread, and I gotta tell ya, awesome.I do believe that Stan mention where he got these recipes, and I will share those with you later. He also said has made the Honey Wheat Bread recipe that Lewis and Clark used during their exploration


It was great and well worth the time to sit back and listen, I even learned a few things that I didn't know. I was in good company with like minded folks, and one couple that visited really found it a full on learning class. It was great watching them get excited and being amazed by a wonderful end product, by such a simple means..
I know that Stan took his 62 years of skill, trimmed off the fat and just taught us what is right. His cooking skills shined through the final end product. Every one left there more educated and amazed by his skills...
Friday, September 14, 2012
The Birth Of The Smoothie
There are a few dishes that sit on my table today as did when I was a child. It is sometimes wonderful how we relate food today and the memories from our childhood, sometimes it isn't.
Traci, my sister can correct me on this one, however I am sure it was in October of 1978. We lived in a shanty in a small town in Clarksburg Pa. It was once a sturdy home, left to time and rented without up keep. The coal door still opened as we would feed the coal furnace from the basement and the coal truck put coal through that door. I doubt that at any time in life of that house was it ever warm during the winter.
I had returned from shoveling coal into the furnace as I was told to do, steam in the air, windows covered in condensation, the old brown TV with a fuzzy picture of the evening news was on. Traci and I often peeled potatoes as well as help Mom prep dinner as she had a full time job.
Dinner time in our house was that, all the family come together, sit, ask for people to pass around stuff. It was a Friday evening and Bobby's two children spent that weekend with us. So with 4 children, when Mom shouted dinner, the whole house seemed to rumble and shake as we made our way to our seats at the table. But this night it was a quiet "drag" to the table.
It isn't my fault if your having your own flashbacks by this time, perhaps, but let me tell you more.
Bobby and Mom thought a good meal was a meal where you would have to eat stuff that children think is gross. It doesn't matter how it was cooked, it was just nasty. Bobby's pick that Friday's meal, saute' liver and onions... with mashed taters...
I tried for an hour to climb my way through this meal, it was nothing smaller than Mt Everest, and almost no place to drive my fork in. It was cold and harsh, but Mom just kept pushing forward... Your not leaving that table till your plate is clean.. I remember listening to the clock tick as if minutes were hours...
As time past, I was alone in the kitchen while every one else fought for a spot to watch TV. Mom went in and put her night gown on... I knew better to waste the food, that is the real reason I didn't try to out smart my way through it. I wasn't a very clever child either and knew I faced a spanking or worse if I did get caught. Then, with a sad face as I looked at her, she said right....
Mom was a War baby and was raised by her Mom and a nanny as the story was told to me. So she had some of that hard liner and dry humor about her that had been caste into her as a young child by a Brit Nanny.
The blender was pulled out, she grabbed my plate, scrapped it into the blender, she came back and grabbed my golden Tupperware plastic glass which was filled with whole milk. In it went like she was a master chef creating a master piece... The blender bogged a few times at the start... than it ran...
She filled that same glass up, placed it before me and ordered me to drink it. I did so in total fear that she was about to become a monster.. Than she filled it up again until the blender was empty, again she ordered me to drink it, but this time my gag reflexes were about to explode. I lifted it up slowly, and couldn't get that liver infused milk drink taste out of my mind. I was crying and begging my way out of it, but I was stuck...
So the birth of liver and onions smoothie was born... The taste test didn't do so well, so it never became a popular fade diet or smoothie...
PS Please look at the labels I have attached to this post....
Friday, September 7, 2012
How To Make Your Own Breakfast Sausage W/ Recipe
Memories of smelling bacon from downstairs always woke me up and made my tummy growl. At home on the farm, it was a frosting designed window as I looked out the window at the sun rising. At Grandpa's it was a cool morning in Hornsby Hollow, and the sun was up and the chickens were calling out to be let out. Isn't it funny how we can recall memories from smells?
Well, I am creating new smells for my children, and from my own recipes, local meat, and organic seasonings, so which I will add were grown right here on my homestead. Seasonings are troublesome for me as I can grow a lot, but some I can not and I rely on other suppliers, so I do the best I can to research my sources.
So lets talk about breakfast Sausage, why? Because I want to do something different and there is a very limited selection out there, and the ones that are out there that are links, some of them are so processed they aren't even sausages....
Ѽ How about a couple things found right on the Homestead? How about some Maple and Apple Breakfast Sausage links?
4 lbs of lean pork
1 1/4 pork fat
6 tsp. garlic powder
2 cloves fresh garlic
3 tsp. crushed Sage
3tsp black pepper
1 tsp of celery seed
2 tsp of smoked paprika
1 tsp marjoram
2 tbsp of dried parsley
1/2 apple sauce
1/3 cup apple juice
1/4 cup maple syrup
3 tbsp of lemon juice
34-36 mm casings ( I like New Zealand Lamb casings)
Cut and grind meat and pork fat to a fine texture together..
In another bowl, blend spices add apple sauce/juice and lemon, mix well. Add bowl ingredients and meat and mix at room temperature until well mixed. Put it in the fridge and let it set 12 hours.
Soak your casings and rinse them several times...
Stuff the meat into casings to 5 or 6 inch long links, or make into patties.... Freeze or use within a couple days.

Wednesday, August 29, 2012
Eggtastic Homesteading With Chickens
People talk about the hundred dollar egg when I tell them that I raise chickens for eggs. As you know, there is a lot more to raising chickens than just getting eggs.
To me, anything labeled organic is worth looking into, and anything that the Government says organic or free range isn't really what might be in there. People that raise their own chickens can tell some of you that your eggs that you buy and homegrown eggs taste different, and they do.I know that my chickens eat a very healthy diet and are very happy birds. I know that the egg I am eating is a good quality egg.
I also enjoy having the chickens around as pets, they develop their own personalities as well as teach children about caring and responsibility. When good food goes in a couple good things come out, eggs and poop. We eat the eggs, and I use the poop in my garden.
Chickens will also come to you if your outside and want to see if you have something good for them to eat. My kids have learned to keep a little scratch in their pockets, and like dogs, the chickens will come calling if they see you.
Nested in our hand paint Gourd bowl is our first batch of eggs from our second flock.
 ....................Click the picture to enlarge it.....................
To me, anything labeled organic is worth looking into, and anything that the Government says organic or free range isn't really what might be in there. People that raise their own chickens can tell some of you that your eggs that you buy and homegrown eggs taste different, and they do.I know that my chickens eat a very healthy diet and are very happy birds. I know that the egg I am eating is a good quality egg.
I also enjoy having the chickens around as pets, they develop their own personalities as well as teach children about caring and responsibility. When good food goes in a couple good things come out, eggs and poop. We eat the eggs, and I use the poop in my garden.
Chickens will also come to you if your outside and want to see if you have something good for them to eat. My kids have learned to keep a little scratch in their pockets, and like dogs, the chickens will come calling if they see you.
Nested in our hand paint Gourd bowl is our first batch of eggs from our second flock.

Sunday, August 19, 2012
Real Homesteding For Real People, DANGER! (Graphic PG-13)
For most people here you understand how I live and the reasons why I live the way I do. It is a system that balances on many factors, some I can control, some I can't.
I know I have had ONE egg fried and savored in the last two months. No pancakes, no Souffles, no cakes, nothing that requires a egg. Sadly my old flock is in its senior years, and the girls are beyond their hot flashes and have just about stopped laying. I would cull them, but their are our first flock and I said I would only cull them if it made them live more comfy.
The new flock has had a Rooster, a kind gentle Silkie. I didn't know he had fight in him, but now I know he does, and he is ready to defend the flock.
Growing up on a Farm, you understand sometimes bad things happen. In order to secure the problem you have to look at the evidence and decide how and what happened. Even when you look at what is there before you, it isn't what it seems.
Joshua came in and mentioned he saw a Red-Tail Hawk looming in the trees near the coop and he saw one dead chicken and other stuff. We had just come home from Church and I was cooking lunch, but it was a Homesteaders worst fear, grabbing the gun to defend what is yours. I will defend my way of living and my food including my animals.
Wait... You can't shoot at a Hawk against the law, but my thoughts were different as he said he saw a dead chicken. I knew it wasn't a Hawk, a Hawk would carry its pray off to eat... But I knew that the killer was near and close by. I thought a dog was near by, and if lived by me and your dog entered my property line and killed my chickens, I would kill your dog. I have no relationship with your dog, my dog has been trained to guard the chickens and not harm them.
So as the evidence was there, a dead chicken laid at my feet, I looked at the method of killing and looked around the pen. It was the scene of horror for a chicken, a real reason why they are so skittish by nature. Piles of feathers, each pile near or around the edge of the fence.
I figured if a coon had made the kills, I would find more dead chickens as I had 7 still missing. I ruled out a yottie, and then a weasel was considered. I didn't know so we recovered the live chickens secured them.
After lunch I went out to look around and decided to make my "chicken call" just in case the girls had escaped some how and made a run for it... What do you know, they did, and they were still alive and called back to me!! Scared, but still alive, the Araucana ran to me (we are friends) and so she was happy and settled up in my arms. I called out to Danielle and Jessica to help me, I told Joshua where to go. We got four of them, the other three had been hurt pretty bad by the feathers in the pen. By evening they showed up ready for food and water.


I suspect a young coon came in and the rooster defended the flock while many of the got away. We did loose one chicken, and she was buried as she died unexpected and was honored.
The great news is that the girls have started to lay!!

Subscribe to:
Posts (Atom)